Reamer Repair and Maintenance 101
February 21, 2019
Lifecycles encompass the horizontal directional drilling (HDD) industry daily.From pipe installation products, drilling equipment and tooling these cycles help contractors and suppliers know when to repair or replace items. Typically, drill pipe and equipment are maintained by product guides and service manuals. Tooling and reamers can be quite different due to the lack of such documents.
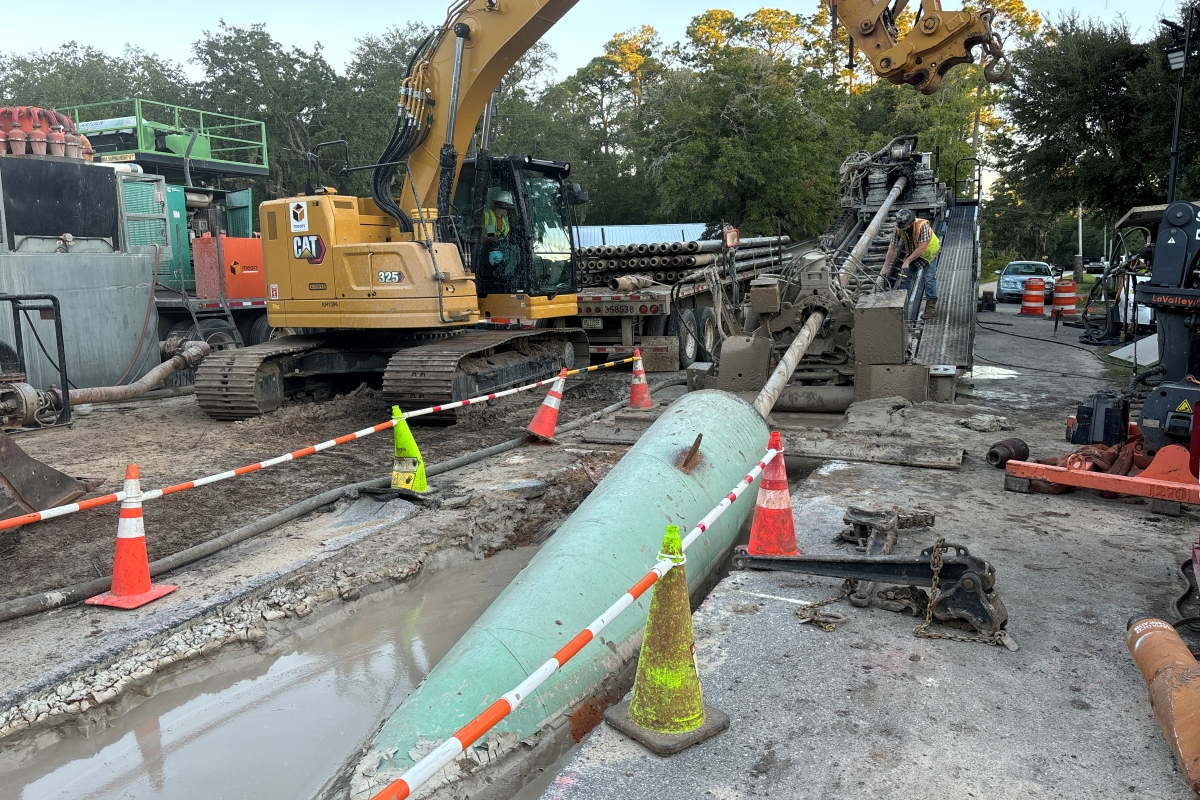
Tooling and reamers are a vital part of today’s jobsite. They can be used in a variety of soils and distances. Both variables warrant some level of maintenance guidelines. If left unnoticed, it may cause shorter life span, lower production rate and in most cases unexpected project expenses.
Much of our industry has a good handle on pilot tooling such as bits and housings. These tools are traditionally machined and produced by a variety of manufacturers. Each use similar cutting features and designs so wear and damage is consistent. These tools are used to its full capacity and replaced with a new purchase. Reamers can be looked at differently due to price, size and construction. Awareness of these three factors gives them a greater tendency to be maintained and repaired.
RELATED: Radius HDD: Looking at Things a Little Differently
Reamers are traditionally welded and constructed with steel, wear protection and carbide components. All of which can be inspected or replaced on site. The key is to know what you’re looking for with your visual inspection. Be consistent with this inspection and it starts on your new tool. Get familiar with your reamer on Day One and this will help to maintain it in the future.

Spotting deviations, cracks, flaws and realistically giving you peace of mind, your tool is in good working order. It’s best to use a simple checklist. Jot down key areas of the tool you would like to monitor. The shaft, each connection, cones or teeth, swivel, fluid ports and welds. This will become your preventative maintenance guide that you can use towards any of your tooling accessories. It should even give you a head start on potential repairs needed prior using the reamer on a project.
While performing your visual inspection, start with your shaft and connections. Look for diameter changes, shoulder belling or flaring and thread quality. Damage may be found due to several variables; torque, grease contamination or abrasion wear. You might need to get this in for a quick re-thread. A tip to protect your shaft from these issues, utilize a sub saver in between your tool and the drill pipe. This piece can be changed out regularly and decreases the expense of replacing the entire shaft. Plastic or steel protectors should be used to eliminate potential damage between use or job transfer.
RELATED: Shopping for Used HDD Tooling? Here Are Some Tips to Keep in Mind

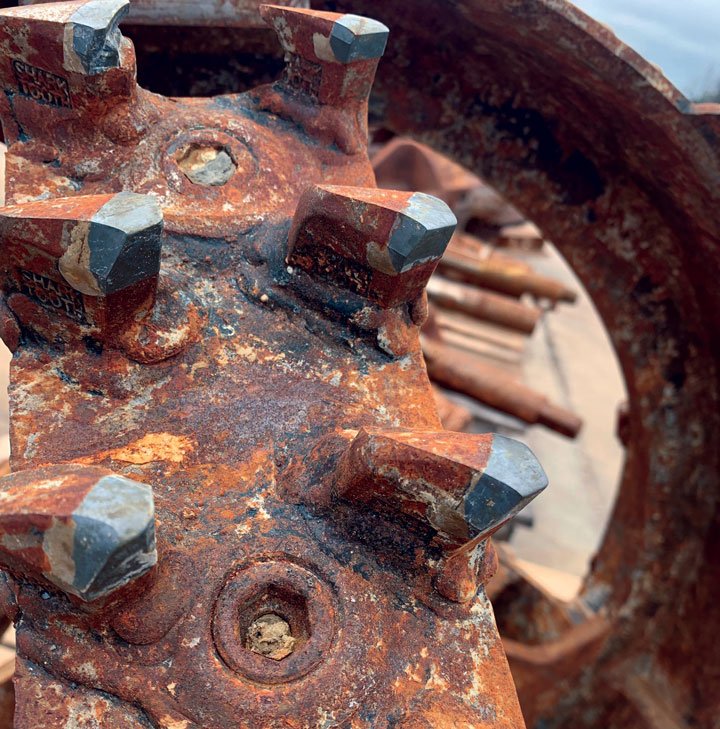
Identify exposed areas such as rings or packing surfaces of the tool. These areas stay in contact with the formation integrity of the bore and displacing spoils. This is a high-wear section of the tool and as spoils become smaller, they will eat away and damage the tool. Adding hard face to those exposed areas of the reamer will give it longevity. Hard face can be found at most welding supply stores and is a tool’s best friend.
While inspecting the body or main components, make sure the cutting structure is intact. Carbide conical teeth, shark teeth and replacement shanks can become cracked or missing and will decrease performance. If you need to replace the tooth, make sure to turn it into the cut. Following path rotation will minimize drag through the hole, which will perform optimally. Replacing it completely or adding a cutter in front can protect this area and decrease the likelihood of further damage.
Reamers with built-in flange swivels continue to gain popularity. Typically, you only found them in fluted reamers and greasing instructions were given to the operator at the time of purchase. With the improvements in manufacturing and including swivels in all reamer types, these instructions are left out.
RELATED: All the Right Moves: Charles Machine Works Expands Its Trenchless Market
The swivel needs to be flushed after each bore to protect bearing life. The flange swivel comes with a grease port and relief valve. Apply a few pumps of grease while simultaneously turning the tab or clevis portion of the reamer. This will distribute grease into the bearings while also clearing out the old grease. Most swivels will on these reamers will have an actual service manual.

The hole opener is a reamer of choice in all formations. Trade name “split bit” reamer utilizing tri-cone bit segments uniformed in a circle to complete solid formation bores. Using them with slow rotation and high pull force gives this tool advantage over most. When purchased it needs more care and service than a traditional tool. Beyond the normal check list, there are three critical areas of each segment: bearing, cone and skirt tail or gauge protection.
Check and maintain bearing by rotating cones with your hand or strap tong. Spinning each cone will help clear debris and flush bearing. Sealed bearing cones will turn slowly with some rigidity. Seals will deteriorate and spin a little freer than when purchased brand new. This doesn’t mean the cone is in bad shape, it will need bit more attention. If you find side-to-side rocking or movement, you will need to repair.
At the end of the day, protecting your investment and staying productive with a little maintenance should be embraced. Make it routine and continue your success downhole.
Charlie Cox is sales manager at Radius.