Product Profile: LMK Gets Patent for Lateral Lining Method
August 1, 2008
 For 15 years, LMK Enterprises has designed and produced trenchless lining systems. In March, LMK was awarded a U.S. patent for CIPP lateral lining through a cleanout with no digging or cutting required. Not only does this new method save time and money, it is truly a no-dig solution, company officials say.
How It Works
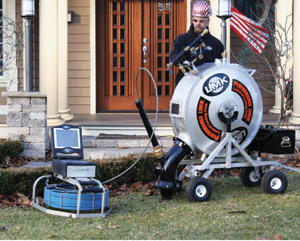
The lining is typically positioned within a translucent bladder or connected to a positioning hose and vacuum impregnated. Then, the liner/bladder assembly is inverted through the cleanout and directed upstream or downstream by use of a guide shoe. Only the bladder is located within the cleanout, as the liner does not begin to invert until it is positioned within the horizontal lateral pipe.
The process includes the use of a pressurized camera port that allows a lateral push camera to be inserted inside the translucent bladder, providing visual verification of the liner placement prior to curing.
“This ensures that the liner is started in the proper location,” explains LMK president and CEO Larry Kiest. “The installer can see that it is fully inverted rather than protruding into the municipal main pipe.”
The system allows for installation from one access point, typically from an outside cleanout or an inside cleanout, normally located in the basement. The installer determines the placement of the lining by where they position the liner within the bladder.
Scenario One below describes how the system could work from a basement.
Scenario One
Assume there is a 4-in. cast iron stack with a test T clean-out. The stack is 20 ft from the foundation and the pipe under the floor is in good condition and contains several side connections. The pipe transitions to 6-in. clay 5 ft past the house foundation. The installer would like to start the liner just past the side connections, yet needs the liner to start in the 4-in. pipe and transition to the 6-in. pipe. The 6-in. line continues 60 ft to the city main. The installer would simply measure from the test T to the main pipe, mark the camera cable and pull back to the location where the liner is to start in the 4-in. pipe and a second mark is made on the camera cable.
The camera cable is laid on the ground; the distance from camera head to the mark closest to the camera head is the length of the liner. The distance from the camera head to the second mark, furthest from the camera head is the length of the bladder. The liner is measured, cut and inserted into the bladder. The liner is then temporarily connected to the bladder. The liner is wet-out inside of the translucent bladder, which allows for visual verification of the resin saturation process assisted by pulling a vacuum on the assembly. Next, the liner/bladder assembly is loaded into a mobile launching vessel and the guide shoe is inserted into the test T positioned downstream.
The launching vessel is positioned with the opening of the test T and air is introduced, causing the bladder to invert. The bladder first encounters the guide shoe and is directed toward the downstream. The bladder continues to invert until it reaches the location where the liner begins. The bladder pulls the liner over itself and now both the liner and the bladder are inverting.
When the liner has fully been deployed, the bladder continues to invert a short distance so as to extend beyond the liner. The liner can be cured at ambient temperatures or accelerated with steam. The liner can be installed where the inflation pressure is never compromised; rather the liner remains inflated from the time of inversion throughout the curing process. This is an important feature as the pressure used to invert liners may push broken pieces of pipe loose and if inflation pressure was removed, broken pieces of pipe could fall on the deflated liner. Inflation, deflation and subsequent re-inflation could result in a defective liner and an excavation to repair the defective section. This process eliminates this concern.
When cured, the bladder is re-inverted and removed from the pipe. There is no cutting required in the liner because the liner is started below the test T and past the side connections. Further, the liner is open-ended at the main location so there is no cutting at the upstream end or the downstream end.
Scenario Two
A similar scenario presents itself from an outside cleanout. Again, the distance from the clean-out cap to the location is measured using a push camera with markings; the liner and bladder are assembled, resin saturation is performed and the liner is inverted in-place. The key is to begin the liner downstream or upstream of the cleanout vertical riser so no cutting is necessary. Not only does cutting require time and money, it is difficult to achieve a full circle, smooth surface cut especially from a 4-in. vertical pipe that dead heads into the lateral pipe.
Previously, lateral linings were inserted from an excavation near the property line or near the house foundation. Not only are excavation pits messy and time consuming, they represent higher cost, restoration costs and increased risk. “This system saves the cost of the cleanout if it already exists,” says Jay Fox of Pacific Liners. “Even if a cleanout is needed, only minimum excavation is needed to install using this system.”
Lining through a cleanout with no cutting required eliminates the need for an excavation pit, reduces cost and additional laterals can be renewed in a day. The homeowner is happier because their yard is not torn up and the sewer has been renewed in just a few hours, LMK officials say.
“I can’t think of a better time to be in the lateral pipe renewal business than now,” says LMK national sales director Rick Gage. “The public awareness, combined with the great need, has grown into a trend.”
Greg Thompson is an assistant editor of Trenchless Technology.